Objectives
intro to the Linux Desktop
to develop basic file management skills in a Linux environment
to use email and folders to submit coursework
For
this lab, you will be using the campus-wide network of Linux
computers.
As part of your computer account privileges, you are given disk
storage space on a networked hard disk, similar to your “M drive”
on the Windows environment. As a student of CSCI150, you also have
read only privileges in certain folders on a shared
network drive. Write-ups for your labs, handouts, homework solutions,
and example files or programs will be placed on that shared drive for
you to access. ( This material can also be accessed from the Windows
environment on what is called the “N drive”.
To gain access to the N drive you have to manually map the drive
letter N to the location \\ad\compsci$
while logged into your Windows account.) Your lab instructor will
assist you in accomplishing this task.
SECTION A: The Linux Desktop
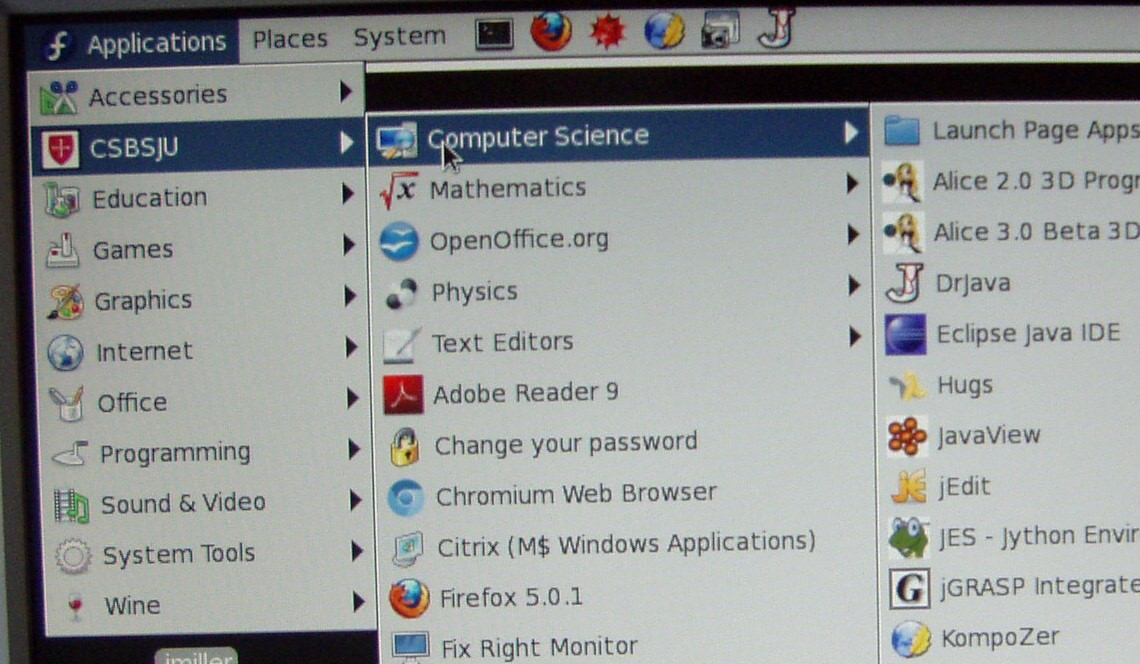
The screen setup you have on the Linux workstation is called Gnome. Gnome is similar to other Graphical User Interfaces (GUIs) like Windows. The main Gnome menu can be accessed by clicking the left-most icon on the menu bar at the top (or bottom) of the screen, (a blue f.) The f-menu has many submenus allowing the user to configure the system as well as run various applications. You can get to many of the applications that will be used in this course by going to the CSBSJU choice on the main menu.
This
lab will introduce basic skills in file creation and management that
you will use throughout the semester. Please use these skills to
keep your files organized in your Linux file system; you will be
creating many files during this lab that both you and your instructor
will need to access. An organized file system will help you
immensely.
In
this section, there are detailed instructions about managing files.
Some of you may already be quite comfortable with creating and
managing your file structure while others may need help. The goal of
this section of the lab is to have you create the following folder
and file structure using some folders and files stored in your
instructor’s file system and others that you will create as needed.
Any program or document stored on the computer is stored in a file. Each file has a name that allows the computer to store your document and retrieve it on command. On Linux systems, files are organized in a hierarchical, tree-like structure where related files are stored together in folders or directories. Though the storage system may be composed of many hard drives networked together, to the users it appears as one single collection, where each file in the collection can be identified uniquely by its name and relative location from the root of the file system. If you are storing many files, it is easier to find a given file by organizing your files into folders or directories. A folder is not a document in itself but is a name that is attached to several similar or related documents, conceptually grouping them together. Once your files are organized in folders, you need not search through a list of all your files to find a given one—you simply look in the proper folder. Each Linux user is assigned a home folder within the file system and all of the files you own will be placed in your home folder. In this section of the lab you will use a Linux file manager system called Nautilus to create more folders within your home directory to assist you in organizing your files for this course and then practice some file/folder management skills to maintain an organized file structure.
EXERCISE 1: Creating Directories/Folders
To open the Nautilus window, do the following:
double-click the “yourname's Home” icon on your desktop
The first folder to be created is CS150 in which you will store the files created in this class
Select Create Folder from the File menu in the Nautilus window
in the right panel, a box labeled “untitled folder” appears
in the box, type CS150 and press Enter
double click on the CS150 folder and you will notice that it is empty (no listing in the right panel)
at the top of the right panel you should now see two tabs, one with your user name and the other with the label CS150. Click on your user name to make it the active folder.
To create a folder in the CS150 folder, do the following:
double click on the CS150 folder icon to make it the active folder
from the menu, select File, Create Folder
in the box labeled, “untitled folder”, type Labs and press Enter
CS150 now has a folder named Labs (check the list in the right panel)
Create 3 more folders in your CS150 folder:
Miscellaneous
Images
YourName
(e.g.
JohnSmith)
Create a folder Lab01 in your Labs folder (remember to make the Labs folder active first).
The folders or subdirectories you have created will be used to store files. All files for CS150 must be stored in the relevant folder. You can put files in these folders by copying files from a different folder, moving files from a different folder, or saving a newly created file in a folder.
We will now use all three of these methods to put some files into the Lab01 folder.
EXERCISE
2: Copying Files and Moving Files using Copy/Paste and Cut/Paste
Methods
Use of Copy/Paste:
Follow the directions below to copy a file from your instructor's course materials folder into your folder. In the Nautilus window, locate the CS150 folder used by your instructor to store the course materials, (/net/people/classes/CS150). To get to these files, open another Nautilus window by double-clicking on your home folder icon on your desktop. Click on File System in the left pane of the window. You will now see the contents of the “root” folder in the contents pane on the right. Now double-click the “usr” folder icon to display the contents of that folder in the contents pane. Continue double-clicking on the desired folder to open it. In turn you will be double-clicking on usr, people, classes, CS150, Labs, and finally on Lab01. Now the contents of the folder Lab01 should be displayed in the contents pane on the right. To copy cmdLineCopy from here to your Lab01 folder in your CS150 folder, do the following:
right click on cmdLineCopy (a drop down menu should appear)
click on Copy (this copies the file to temporary storage until you tell the computer where you want a copy to be pasted)
in the other Nautilus window, locate your Lab01 folder in your directory structure and right click (a drop down menu should appear)
click on Paste. The file cmdLineCopy should now be listed in the contents of your Lab01 folder
Single files, multiple files or entire folders can be copied in this way. When selecting multiple files, hold down the Shift or Ctrl key (found on the bottom left and right of the keyboard) while clicking on the files to be copied. The Ctrl key allows non-contiguous files to be selected. The Shift key allows contiguous files to be selected.
Use of Cut/Paste:
You can move files using the same process as copy/paste described above, except use Cut instead of Copy after selecting the item to be moved, (you can only Cut files that you have full access privileges to.)
EXERCISE 3: Moving files using drag and drop method
It is easiest to see exactly what is happening if you have two Nautilus windows open when you use the drag and drop technique. This allows you to visually confirm the desired file movement. You will not be prompted to confirm your intentions when you use this method. The file will simply be moved to the indicated destination, (*assuming you have the necessary access privileges to the files and folders in use.) To move the file, cmdLineCopy from your Lab01 folder to your Miscellaneous folder, first open two Nautilus windows, each displaying the contents of the folder. Here are step by step directions:
open your CS150/Labs/Lab01 folder in a Nautilus window. The source file, cmdLineCopy, should be visible in the Contents panel on the right.
Open another Nautilus window displaying the contents of your CS150/Miscellaneous folder. Once you can see both the source file and the contents of the destination folder, you are ready to do the drag and drop.
highlight the file to be copied, (cmdLineCopy), by holding down your left mouse button, and then drag it, still holding the left mouse button down, to the desired location (the Miscellaneous folder in your file structure in the other Nautilus window). When your mouse is in the desired destination pane, indicating where the file will be copied to, release the mouse button
You should now see that the file, cmdLineCopy, appears in only one place, the Miscellaneous folder.
single files, multiple files or entire folders can be copied in this way.
*Drag and Drop: file permission issues:
When you are not the owner of the source files, but do have the permission to read the file, a copy of the source file will be made in the destination location instead of moving the original file. This will always be the case when you drag and drop files owned by your instructor. You may have permission to read the files, but will not be able to move them, so a copy will be made.
Try this now by using the drag and drop technique to copy the files, copyMe and dragNdrop from your instructor’s Lab01 into your Miscellaneous folder. Observe the number of places dragNdrop is now stored.
Now, using the drag and drop method again, move the file copyMe from your Miscellaneous folder to your Lab01 folder. Note that both of these folders are yours and you have full access privileges to them, so the file will be moved, (not copied.)
EXERCISE 4: Creating and saving a file
We will create a file and store it in the folder labeled with your name. We will use a word processing program to create the file, so, to unclutter your workspace, first minimize the Nautilus windows by clicking on the ‘–‘ at the top right hand corner.
Start up the word-processor Open Office by choosing f-menu, Office, OpenOffice.org Writer. Type at least a paragraph describing yourself. Include in your description, your name, where you are from, your major, your other interests, any computer experience you have had (including using programming languages, spreadsheets, or databases), your reason for taking this class and any particular hopes or expectations you might have for this class. Boldface and center your name in 16-pt font. (Use any type font). Save this file as aboutMe in the folder labeled with your name. To do this, choose File—Save As from the menu. You will need to make sure that the location in the “Save in folder:” box near the top of the window is indicating the folder labeled with your name in your directory structure. You can traverse to the desired location by double-clicking on the folder icons. Be sure to check that you are in the right folder. You can see the path (folder sequence, ie jmiller CS150 JohnMiller) to your file just above the content window where there is a tab for each folder of the path. Clicking on any one of those tabs will make that folder the active folder and the one that would be used to save your file in. The name of the file must be typed in the box entitled “Name:” before clicking on the Save button.
Do not close the file aboutMe. We will put more in this file later. Simply minimize Open Office. (It will show as a button on the lower task bar when minimized.)
Get a copy of the picture the lab instructor took of you and place it in your Images folder.
Close all programs, saving documents as necessary. Do not log off.
The file management tasks that you did in the first three sections using your mouse and the Nautilus windows can also be accomplished by typing commands from within a terminal window. This is a window from which you can issue commands to the Linux operating system. Create a new terminal window by pressing the icon on the main panel that has a monitor on it or by clicking on the f-menu, then the Systems Tools submenu and then choosing Terminal. Knowledge of the command-line interface in Linux can be very useful and it is helpful to have an understanding of it as you begin learning to program in this environment. This part of the lab will introduce just a few of the Linux commands and if you are interested you can pursue a more in-depth tutorial online.
The terminal window has a prompt, which generally ends in a percent sign and has a blinking cursor, [], after the prompt. When you type a command after the prompt you are said to be entering a command on the command line. However, the command you type will not work until you press the Enter key, at which time the computer will execute your command.
As you use the command line you have a working directory, which is where you are currently located in the directory structure. To see your working directory, you can type pwd at any time at the command prompt (and, of course, then pressing Enter). The pwd command will display where you are. (It stands for Print Working Directory.) Type pwd at the prompt and press Enter now and you should see something like:
...% pwd
/net/people/faculty/cs/jschnepf
...%
Now type ls, (the letters l and s), followed by the Enter key. This is how you tell Linux to show a list of files. For example, you will probably see something like the following:
ls
CS150 Desktop Documents Downloads Music Pictures Public Templates Videos
... %
In this example, the user (that is, you) typed ls followed by Enter, and Linux came back saying that you have several items in the current directory. Notice the CS150 folder you created earlier. (You may see a different list.).
Like most modern operating systems, Linux systems arrange files hierarchically using directories. A directory is a special type of file that contains files. Of course a directory can contain directory files too. Directories are often called folders after the common icon used to represent them as you experienced in the first part of this lab.
Linux uses slashes to indicate directory structure. For example, consider the directory
/net/people/faculty/cs/jschnepf/CS150
This refers to the CS150 directory in the directory called jschnepf. The slashes separate directories in higher and higher levels. Thus, CS150 is a directory inside directory jschnepf which is a directory inside directory cs which is a directory inside directory faculty, which is a directory in directory people, which is a directory in directory net. The net directory lies inside the root directory, which in Linux is represented by a single slash (/).
Every
directory automatically contains two special directories. You
generally won’t see these, but they are frequently useful. (You can
see them if you type
ls
-a)
The directory named . (that is, a single dot) refers to the directory where the system is currently working.
The directory named .. (that is, two periods together) refers to the directory above the current directory.
For
example, if cs
were
the current directory in
the example above, then
..
is
another name for the
faculty
directory
that cs
is
in. Another useful directory to know about is the
~
directory,
which is shorthand for your home directory. (For the user named
jschnepf,
the
home
directory is the directory called
jschnepf
above
and the ~ character would be a shortcut for
“/net/people/faculty/cs/jschnepf”.)
You can move between directories using the cd command (cd stands for Change Directory.) For example, the CS150 directory should be in your current working directory (assuming you are in your home directory at this point). So you can type cd CS150 to move into it. This changes your working directory to be your CS150 directory. If the cd command is executed successfully, you will see the complete path for that directory listed on the next line and then then the Linux prompt will appear on the following line, ready to accept another command. If you type pwd again, it should show your new working directory. You will see something like the following.
...% cd CS150
/net/people/faculty/cs/jschnepf/CS150
...% pwd
/net/people/faculty/cs/jschnepf/CS150
...%
If
you were to type cd
CS150 again,
it would fail, because our current directory (CS150)
doesn’t contain a directory called CS150.
...% cd CS150
CS150: No such file or directory.
...%
However, the following would work.
...% cd Labs/Lab01
...% pwd
/net/people/faculty/cs/jschnepf/CS150/Labs/Lab01
...%
In
this example, we told the computer to change into the Lab01
directory, which
is located in the Labs
directory, which
is located in the current working directory. To go to CS150
directory
from here, type
cd
../.. to move
up two levels. Notice how we use the special hidden directory ..
(i.e. two
dots), which always refer to the parent directory of the current
directory.
Creating Directories and Copying files:
Use the pwd command to confirm that the current working directory is CS150, (if not, use cd to move there.) The Linux commands for creating directories and copying files can be used instead of doing those activities graphically as you did earlier in the lab. Create a new directory in the Miscellaneous folder called LinuxInfo using the mkdir command, (make directory), and then copy the file, cmdLineCopy from the Miscellaneous folder to the LinuxInfo folder using the cp command. by typing in the two Linux commands below.
mkdir Miscellaneous/LinuxInfo
cp Miscellaneous/cmdLineCopy.doc Miscellaneous/LinuxInfo/
When using mkdir, you need to list the complete path from the current directory to the location you want to create the new folder in.
In the copy command above, Miscellaneous is a folder within the current directory, CS150. When using the copy command, cp, you list the path of the source file you wish to copy first, followed by the path to the destination folder. The paths used in both commands can be complete paths including the root folder or they can be stated relative to the current working directory, as was done in the samples above.
Use the copy command, cp, now to make a copy of copyMe.doc from your Lab01 folder and put the copy of it in your LinuxInfo folder. Your current working directory should still be CS150.
Create a folder in the current directory called SampleFolder. Since you are already in the location you want the new folder to be in, simply type:
mkdir SampleFolder
You can delete,(remove) the sample folder you just created using another command, rmdir. Delete it now using:
rmdir SampleFolder
You can check that you accomplished these two tasks using the ls command or by opening a Nautilus window and displaying the contents of the folders.
EXERCISE 6: Viewing your File Structure
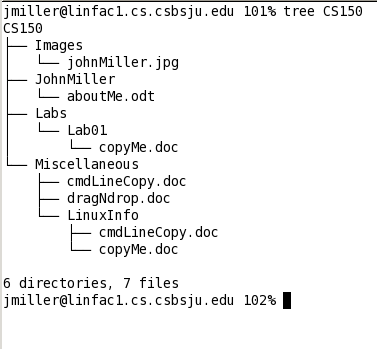
You will now create a tree diagram showing the detailed contents of your CS150 folder in your file structure.
Perform the steps below to create the tree diagram.
Open a new terminal window
At the prompt, type: tree CS150 (i.e. display the tree of CS150 on the screen)
Compare your tree to the tree diagram at the beginning of the lab. If your directory structure is not the same as that image, go back and use your file management skills to get the files and folders in the right place.
When you are ready, show your tree and your aboutMe file to your lab instructor or TA to be checked off on the grading sheet.
Using the Mail Program to Submit the “aboutMe” file
It is assumed that everyone has used the mail program at some time. You can access your Outlook email account by going to the web address https://exchange.csbsju.edu/ using the Firefox web browser, which is available from the menu bar, or from the Internet submenu of the f-menu, or from the CSBSJU submenu. If you have trouble, ask your TA or Lab Instructor. Follow the instructions below to send the file, aboutMe.doc, to your lecture professor and also to your lab instructor.
To insert a file into a mail message
From the Menu bar, select Attach File
Locate the file you want to insert.
Click on the file name and Attach. An icon and filename should appear in the “Attached:” pane.
Then click Send to complete the task.
CSCI
150 Lab01